FLASH AT YOUR OWN RISK -----
I AM NOT RESPONSIBLE FOR ANY KIND OF DAMAGE TO YOUR PHONE
Xperia Z JellyBean 4.1.2 custom rom for walton primo g1
Fast must be root your phone, After do it....
Feature:
Sony xperia z jb 95% features included in this rom.
1.sony walkman
2.sony soud enhancement
3.bravia engine,
4.sony album,
5.sony power saver
6.theming
7.sony launcher
8.x loud
9.fastboot
10.Wifi direct
11.Default Keyboard & sony others features..
install process:
1) First install MTKtools from from attached below link.( RECOVERY.IMG )
2) Download (TWRP)( Recovery.img ) and copy recovery.img in zip file to SDcard.
3) Select recovery update from SD-Card - See more at:
Download link:below link content(mtk tools, TWRP recovery&rom)
2. Copy the downloaded file on your SD-CARD.
3. Power off your phone.
4. Turn your phone on in recovery mode (by pressing VOLUME UP + POWER buttons).
5. Make a backup your current rom. Select “backup and restore”. And then select “backup”. When it is done select “Go Back”.
6. Select Wipe/Data Factory Cache.
7. Select Wipe Cache Partition.
8. Go to advanced and select wipe dalvik cache.
9. Go back to the main menu.
10. Select “Install zip from sdcard” –> “Choose zip from sdcard” –> Now select “Walton primo g1 jelly bean Xperia.zip”–> Select “Yes”
11.wipe dalvik cash
12. Go back to main menu and select Reboot.
13. Enjoy
Note: I hope everybody enjoying this rom
How to Root & UnRoot Walton Primo,Primo R1, Primo G1, Primo F1, Primo G2 with Bin4ry

Root:
Step 1: Connect your handset with usb cable to pc
Step 2: Enable USB Debugging in handset. (Settings>Developer option>USB debugging)
Step 3: unzip & Open RunMe.bat file from Bin4ry for primo series folder
Step4: Select device type normal 1 and press enter
Step5: Look at your phone and select Restore
Done, your phone is rooted successfully, now you will find SuperSU on phone menu. Enjoy!!!!!
UnRoot:
Step 1: Connect your handset with usb cable to pc
Step 2: Enable USB Debugging in handset. (Settings>Developer option>USB debugging)
Step 3: Open RunMe.bat file from Bin4ry for primo series folder
Step4: Select device type x and press enter, press y then Enter
Step5: Please restart your phone manually
Done, your phone is unrooted successfully, now there is no SuperSU apps on phone menu. Enjoy!!!!!
Tools Download link: Download
*** Apply at your own risk. It may void your warranty if you root your phone. We aren't responsible for any kind of damage of your phone. ***
Step 1: Connect your handset with usb cable to pc
Step 2: Enable USB Debugging in handset. (Settings>Developer option>USB debugging)
Step 3: unzip & Open RunMe.bat file from Bin4ry for primo series folder
Step4: Select device type normal 1 and press enter
Step5: Look at your phone and select Restore
Done, your phone is rooted successfully, now you will find SuperSU on phone menu. Enjoy!!!!!
UnRoot:
Step 1: Connect your handset with usb cable to pc
Step 2: Enable USB Debugging in handset. (Settings>Developer option>USB debugging)
Step 3: Open RunMe.bat file from Bin4ry for primo series folder
Step4: Select device type x and press enter, press y then Enter
Step5: Please restart your phone manually
Done, your phone is unrooted successfully, now there is no SuperSU apps on phone menu. Enjoy!!!!!
Tools Download link: Download
*** Apply at your own risk. It may void your warranty if you root your phone. We aren't responsible for any kind of damage of your phone. ***


WALTON Primo H1 Software update Firmware,Tools Free Download
WALTON Primo H1 Software update (AP+BP) Guide

1) Install AP part driver
Power off handset, press “Power key + Voice Up key” until the screen shows green, plug in usb cable, PC will remind you of installing new hardware. Unzip “ Driver”, select adb driver file, install AP driver.
Path: Right click on My computer>Manage>Device manager>Android(Yellow notification)>Update driver software>browse path> select adb folder >Continue anyway>finish
When you install AP driver successfully, you will find “Fastboot interface” in device manager. As below

2Install BP part driver
(i) Power off handset, press “Power key + Voice down key” until the screen shows QPST mode, plug in 5Pin USB cable, Unzip “Driver”, select HK11-VB717-27_1.0.56 driver file, install BP driver.
Path: Right click on My computer>Manage>Device manager>Tiyanyu HS-USB Driver (Yellow notification)>Update driver software>browse path> HK11-VB717-27_1.0.56\Win32\x86\free >Continue anyway>finish.
(ii) When your BP driver is installed successfully, you will find Qualcomm HS-USB ports in device manager. As below:

Software Upgrading:
1.Download BP
Open EMMC_Download_V1.2.4 tool, set your handset into BP mode (Power key+ Voice down key) and connect your phone with USB cable.
1.Download BP
Open EMMC_Download_V1.2.4 tool, set your handset into BP mode (Power key+ Voice down key) and connect your phone with USB cable.

2.AP Download:
Open Qualfast 2.0.5 tool, set your handset into AP mode (Power key+ Voice up key) and connect your phone with USB cable.
Open Qualfast 2.0.5 tool, set your handset into AP mode (Power key+ Voice up key) and connect your phone with USB cable.

1. Click Set path>Browse folder>Select 593517_8734_V006021
2. Click Ok for Start download.
3. Run *#8929#
4.Built-in apps installing
a) Put update_walton_H1.zip into root directory of SD card .
b) Run *#8348#
Note: If your antivirus detects Flash Tool as virus, disable your antivirus till software is finish.
2. Click Ok for Start download.
3. Run *#8929#
4.Built-in apps installing
a) Put update_walton_H1.zip into root directory of SD card .
b) Run *#8348#
Note: If your antivirus detects Flash Tool as virus, disable your antivirus till software is finish.

Walton Primo G2 firmware Upgrade Flash Tools,Firmware & Procedore
WALTON Primo G2 Software update (AP+BP) Guide

Driver installation
1) Install AP part driver
Power off handset, press “Power key + Voice Up key” until the screen shows green, plug in usb cable, PC will remind you of installing new hardware. Unzip “ Driver”, select adb driver file, install AP driver.
Path: Right click on My computer>Manage>Device manager>Android(Yellow notification)>Update driver software>browse path> select adb folder >Continue anyway>finish
When you install AP driver successfully, you will find “Fastboot interface” in device manager. As below

2) Install BP part driver
(i) Power off handset, press “Power key + Voice Down key” until the screen shows QPST mode, plug in 5Pin USB cable, Unzip “Driver”, select HK11-VB717-27_1.0.56 driver file, install BP driver.
Path: Right click on My computer>Manage>Device manager>Tiyanyu HS-USB Driver (Yellow notification)>Update driver software>browse path> HK11-VB717-27_1.0.56\Win32\x86\free >Continue anyway>finish.
(ii) When your BP driver is installed successfully, you will find Qualcomm HS-USB ports in device manager. As below:

Software Upgrading:
1.Download BP
Open Primo Download V1.2.3 tool, set your handset into BP mode (Power key+ Voice down key) and connect your phone with USB cable.

1. Click set path>Browse folder>Select 592522_8550_WCDMA_V000001
2. Click Download All
2.AP Download:
Open Primo Flasher V1.0 tool, set your handset into AP mode (Power key+ Voice up key) and connect your phone with USB cable.
2. Click Download All
2.AP Download:
Open Primo Flasher V1.0 tool, set your handset into AP mode (Power key+ Voice up key) and connect your phone with USB cable.

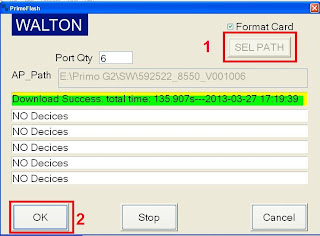
1. Click Set path>Browse folder>Select 592522_8550_V001006
2. Click Ok for Start download.
Note: If your antivirus detects Primo Flash Tool as virus, disable your antivirus till software is finish.
2. Click Ok for Start download.
Note: If your antivirus detects Primo Flash Tool as virus, disable your antivirus till software is finish.
Nokia asha 200(rm761) v 11.81 Mcu,Ppm,Cnt Flash File

<<<New Release Version Flash File>>> Nokia asha 200(rm761) Version11.95


Walton Primo G1 Jelly Bean v.4.1.2 for primo G1 [Update] Flash Tool ,Driver ,Free Download
1. Install driver
2. Open Flash Tool

3. Open Download Agent and select MTK_AllinOne_DA

4. Open scatter_loading and select scatter file
SW---> WBW6803WA_0410_T8142 MT6577_Android_scatter_emmc
5. Click Firmware->Upgrade and connect USB cable with mobile without battery
6. Insert Battery then start downloading..
7. When it shows Firmware Upgrade , then installation is completed.

After Firmware Upgrade give Reset to Factory Setting
Walton Primo D1 Flash File ,Tool ,Roots& How To Flash ? Procedore Free Download
1.Install Driver
2.Open Flash Tool

3.Open Download Agent & Select Mtk_Allinone_Da

4.OPen Scatter-Loading & Select Sw--->WBWS212WA_0301_T5067? MT6577_Android_scatter_emmc
5.Click Firmware -->Upgrade & Connect Usb Cable With Mobile (Without Battery )
6.Insert Battery then start downloading ..
7. When it shows Firmware Upgrade with green colour, the installation is completed

-----: Download Media Fire Link -----:
Walton Primo C1 Flash File,Tools,Root & Procedore Free Download
1.Double Click Setup.Exe To Install The Driver

2.Double Click ResearchDownload.Exe and Open The Flashing Tool

3.Click The First Button ,Select The Correct pac File and Confirm

4.Click The Third Button To Get Ready to Start

5.Connect The Handset To pc to Usb Data Cable ,Ling Press Volume Down Key And Insert The Battery .Now Starts install The Software
6.When it Shows Passed In Green ,The installation Is Complete

-----: Download Link To Media Fire :-----
Walton Primo F1 Update Flash File ,Tools,Drivers, Root & How To Flash ? Procedore Free Download
New official firmware for primo F1 (Build Number: A51B_WALTON_V0_0_9) [solved: black screen, memory & others bugs]
D/L text file from attachment "Primo F1 FW v. 0_0_9" you will get download link
Guide:
1. Install USB cable drive software. (From "Driver" folder )
2. Open Flash Tools MultiportDownload.exe (From "Download Tools" folder)
3. Select smart phone and press ok.
4. Click "Select file" for select scatter file
5. Select scatter file (MT6575_Android_scatter_emmc) from software folder (Under "WALTON_Primo_F1_Firmware" folder)
6. Download file load successfully will show. click "ok" button.
7. Press "Start all"
8. Under POWER OFF mode press & hold Volume up and down key together, then put USB cable in to Handset charging port
(with battery). Software process will be start within few second.
9. Wait till complete software update process.
** NOTES... If auto driver installation failed (step 1) then install manually after ( step 8 ) connect USB Cable as soon as possible.)
-----:Download :-----
Walton Primo D1 Flash File ,Tool ,Roots& How To Flash ? Procedore Free Download

1.Install Driver
2.Open Flash Tool
3.Open Download Agent & Select Mtk_Allinone_Da
4.OPen Scatter-Loading & Select Sw--->WBWS212WA_0301_T5067? MT6577_Android_scatter_emmc
5.Click Firmware -->Upgrade & Connect Usb Cable With Mobile (Without Battery )
6.Insert Battery then start downloading ..
7. When it shows Firmware Upgrade with green colour, the installation is completed
-----: Download Media Fire Link -----:
Walton Primo C1 Flash File,Tools,Root & Procedore Free Download

1.Double Click Setup.Exe To Install The Driver
2.Double Click ResearchDownload.Exe and Open The Flashing Tool
3.Click The First Button ,Select The Correct pac File and Confirm
4.Click The Third Button To Get Ready to Start
5.Connect The Handset To pc to Usb Data Cable ,Ling Press Volume Down Key And Insert The Battery .Now Starts install The Software
6.When it Shows Passed In Green ,The installation Is Complete
-----: Download Link To Media Fire :-----
Symphony W25/Karbon A7/Ktouch W650 & Mobistar S01 ICS update & Root
Good news for Symphony w25/Karbon A7/Ktouch W650 & Mobistar S01 phone user. All of you are using a old version of android operating system 2.3 (GingerBread). Don't worry this is new operating system of android for you. Now you are able to Update your phone in ICS (ice cream sandwich) 4.0.4 and also can get root permission ICS (ice cream sandwich) is a beautiful features of android operating system. You can customize your apps, move all apps in sd card, also can remove unnecessary apps from rom and so many things. If you root your phone you will get all extra stuff of android. It is a faster operating system than GingerBread. Now i will show you that How to update ICS & Root Symphony W25/Karbon A7/Ktouch W650 & Mobistar S01. Just follow the instruction.
Solution:-
Files need to be downloaded:-
1. AP & BP for ICS S01
2. Drivers or Alternative link
3. Flash tools or Alternative link
4. Symphony ICS stable
6. 7-zip
Password:- jabadbd24
Requirement:-
Windows 7


Process:-
1. Download all files in your computer
2. Now put them in a folder
note: Put them in "D:\W25" folder
3. Now install "7-zip" in your computer
4. Now extract the selected files using 7-zip

5. Make sure that you have following folders in "D:\W25" folder

6. Now go to the folder location where you put the downloaded files
7. Then go to "(AP+BP)_ICS_S01\(AP+BP)_ICS_S01\ICS_S01" folder
8. Extract "NPRG7627A.zip" by clicking it 7-zip>Extract Here
9. Now copy "NPRG7627A.hex" to "591357_8376_WCDMA_V0005" folder
10. Switch off your phone
11. Remove battery, SIM cards and SD card
12. Now place battery on your phone
13. Press and hold "POWER BUTTON + VOLUME DOWN BUTTON" together, you will see “QPST Entry Download”
14. Now Connect your phone to your pc
15. You will see a popup window, cancel it
16. Go to your device manager and follow the procedure below


17. For you the driver location will be "D:\W25\S01_Drivers\drivers\Driver\HK11-VB717-27\HK11-VB717-27_1.0.56\Win32\x86\free"
18. Click Ok and press Next
19. Driver will be installed
20. Close it and Go to device manager and you will see something like this

21. In my case i got COM3, you may have diffrent port number
22. Now go to "D:\W25\S01_flash_tools\fast_boot"
23. Open “fastboot1.0.2.4.exe” You will see something like this

24. Click on “BP Browse” select folder “D:\W25\(AP+BP)_ICS_S01\(AP+BP)_ICS_S01\ICS_S01\591357_8376_WCDMA_V0005"
25. Put the port number on “BP Port” and press Download
26. Download should start if everthing is allright

27. After download compleate “fastboot1.0.2.4.exe” will close by itself
28. You need to pull your phone bettery to shut it down
29. Disconnect the phone form your pc
30. Place your phone battery on the phone
31. Now press "POWER BUTTON + VOLUME UP" and wait untill you see a GREEN display on your phone
32. Connect you phone and you will see a new Device is found named "Android"
33. Now install the drivers by following procedure like prevoiusly shown and use the folder location “D:\W25\S01_Drivers\drivers\Driver\adb_driver” for drivers
34. After driver instlation compleate, go to “D:\W25\S01_flash_tools\EMMC_AP”
35. Install "vcredist_x86"
36. Now open “QUALFAST2.0.4(Factory).exe”
37. Click on “SEL PATH” button and select “D:\W25\(AP+BP)_ICS_S01\(AP+BP)_ICS_S01\ICS_S01\TBW591357_9999_V0001_2" folder click ok, you will see

38. Now press “OK” and wait for first “Waiting Decices…” to be compleated and then disconnect the phone

39. Pull your battery and start your phone, ICS should start with forign language
40. Now extract "CWM-English.rar" by clicking it 7-zip>Extract Here
41. Shutdown your phone
42. Insert your sim and sd card
43. Press "POWER BUTTON + VOLUME UP button" till the GREEN display appears
44. Connect your phone with the computer
45. Go to "D:/W25\CWM-English" folder
46. In this folder click "SHIFT + Right Click" and select open command window here
47. Now type Fastboot devices and press enter
48. You should see something like “???????????? fastboot
49. Now type fastboot boot recovery-english.img and press enter
50. Wait sometime, CWM recovery should boot
51. Now from the phone menu Select “wipe data/factory reset” and select yes
note: You can use volume up, volume down and power button to do this operation
52. After finishing slect “wipe cache partition” and select yes
53. After that, go to “mount & Storage” > “Mount Usb Drive”
54. Now sd card will be mounted on your computer
55. Copy “D:\W25\clockworkmod_rainwalker\clockworkmod” to your sd card
note: Copy "clockworkmod" folder in root of sd card
56. After completing select “Unmount” from your phone and Select “Go back”
57. Select “Backup and Restore”
58. Select “Restore”
59. Select “ICS_W25_Stable” and confirm, wait for restore to complete
60. Then reboot your phone
note: If you do not see “ICS_W25_Stable” in “Restore” option then restart your phone and try again
61. Then start your phone and enjoy
Finally, Problem solved!
Now you can update ICS (ice cream sandwich) & Root your Symphony W25/Karbon A7/Ktouch W650 & Mobistar S01
Congratulations!
Subscribe to:
Posts (Atom)
All About Mobiles Headline Animator