All About Mobiles

http://www.infolinks.com/join-us?aid=2084565

Firmware for all HTC model

7(Mozart)

HSPL

DFT_HSPL_WP7FG1_INSTALL.exe [calculate md5sum]

Original

RUU_Mozart_HTC_Europe_1.30.401.01_5.54.09.21_22.33 b.50_RELEASE.exe
RUU_Mozart_Orange_CH-FR_1.30.071.01_5.54.09.21_22.33b.50_RELEASE.exe
RUU_Mozart_Orange_ES_1.30.075.01_5.54.09.21_22.33b .50_RELEASE.exe
RUU_Mozart_Orange_FR-B2B_1.30.073.01_5.54.09.21_22.33b.50_RELEASE.exe 
 
RUU_Mozart_Orange_UK_1.30.061.01_5.54.09.21_22.33b .50_RELEASE.exe
RUU_Mozart_S_HTC_Europe_4.06.401.00_5.69.09_RELEAS E.exe
RUU_Mozart_S_HTC_Europe_5.01.401.04_5.71.09.02a_22 .51.50_RELEASE.exe
RUU_Mozart_S_HTC_RUS_4.06.411.00_5.69.09_RELEASE.e xe
RUU_Mozart_S_HTC_RUS_5.10.411.01_5.69.09_RELEASE.e xe   

RUU_Mozart_TMO_AT_1.28.112.03_5.52.09.16_22.33a.50 _RELEASE.exe
RUU_Mozart_TMO_AT_1.32.112.01_5.65.09.25_22.45.50_ RELEASE.exe
RUU_Mozart_TMO_CZ_1.28.113.03_5.52.09.16_22.33a.50 _RELEASE.exe
RUU_Mozart_TMO_DE_1.28.111.03_5.52.09.16_22.33a.50 _RELEASE.exe

RSPL

DFT_RSPL_WP7FG1_LAUNCH.exe [calculate md5sum]
 Advantage(Athena) HTC Firmware......
HSPL

AthenaWrapper.exe [calculate md5sum]

Rom original

RUU_Athena_HTC_DAN_2.21.403.1_1.50.00.00_Ship.exe
RUU_Athena_HTC_FIN_2.21.414.1_1.50.00.00_Ship.exe
RUU_Athena_HTC_FRA_2.21.406.1_1.54.00.00_Ship.exe
RUU_Athena_HTC_FRA_3.27.406.2_1.58.00.00_Ship.exe 
Advantage(Athena) HTC Firmware......
RUU_Athena_HTC_GER_2.21.407.1_1.50.00.00_Ship.exe
RUU_Athena_HTC_ITA_2.21.408.1_1.50.00.00_Ship.exe
RUU_Athena_HTC_ITA_3.29.408.1_1.58.00.00_Ship.exe
RUU_Athena_HTC_NLD_2.21.404.1_1.50.00.00_Ship.exe 
 
 Advantage(Athena) HTC Firmware......
RUU_Athena_HTC_NOR_2.21.409.1_1.50.00.00_Ship.exe
RUU_Athena_HTC_PTG_2.21.410.1_1.50.00.00_Ship.exe
RUU_Athena_HTC_PTG_3.30.410.1_1.58.00.00_Ship.exe
RUU_Athena_HTC_RUS_2.21.411.3_1.50.00.00_Ship.exe 
 Advantage(Athena) HTC Firmware.....
RUU_Athena_HTC_SPA_3.29.412.3_1.58.00.00_Ship.exe
RUU_Athena_HTC_SVE_2.21.413.1_1.50.00.00_Ship.exe
RUU_Athena_HTC_US_2.19.453.4_105_1.47.51.00_Ship.e xe
RUU_Athena_HTC_WWE_2.21.405.2_1.50.00.00_Ship.exe
RUU_Athena_HTC_WWE_3.27.405.3_1.58.00.00_Ship.exe
unlock

unlock.exe  
 ChaCha HTC Firmware.....
HBoot


PH0611000.zip [calculate md5sum]

recovery

ClockworkMod Recovery v5.0.2.8.zip [calculate md5sum]
PH06img.zip [calculate md5sum]
 Desire(Bravo) HTC Firmware.....
HBoot

PB9922000.zip [calculate md5sum]

Recovery

Clockworkmode Recovery
recovery-clockwork-touch-5.8.0.2-bravo.img [calculate md5sum]

Push Recovery
PB99IMG.zip [calculate md5sum]
  Desire HD(Ace) HTC Firmware.....
Desire HD(Ace) HTC Firmware.....

GoldCard

Goldcard_1.0.7.apk [calculate md5sum]
HxDSetupEN.exe [calculate md5sum]
readme.mht [calculate md5sum]

HBoot

PD9810000_1.zip [calculate md5sum]
PD9810000_2.zip [calculate md5sum]

radio

PD98IMG.zip

recovery

Clockworkmode Recovery
recovery-clockwork-5.0.1.0-ace.img [calculate md5sum]
recovery-clockwork-touch-5.8.1.5-ace.img [calculate md5sum]
 Desire HD(Ace) HTC Firmware.....
2.3.4 Persian

cm_ace_full-119.zip

2.3.5 Persian
cm_ace_full-151.zip

ICS 4.0.4
aospX-1.0.0-BR2-DHD.zip

Persian
update.zip

Persian 2.3.7
update-cm-7-20120313-NIGHTLY-ace-signed.zip

RunnyDroid v5.0.zip
 Desire HD(Ace) HTC Firmware.....
Original

ZIP
RUU_Ace_Gingerbread_S_HTC_ARA.zip
RUU_Ace_HTC_WWE.zip
RUU_Ace_Sense30_S_HTC_ARA_3.13.415.2.zip 
 Desire HD(Ace) HTC Firmware.....
RUU_Ace_Gingerbread_S_HTC_ARA_2.42.415.1_Radio_12. 54.60.25_26.09.04.11_M2_release_193079_signed.exe
RUU_Ace_Gingerbread_S_HTC_TUR_2.36.468.10_Radio_12 .54.60.25_26.09.04.11_M2_release_187255_signed.exe
RUU_Ace_Gingerbread_S_HTC_WWE-AFK_2.36.421.10_Radio_12.54.60.25_26.09.04.11_M2_r elease_187238_signed.exe
RUU_Ace_Gingerbread_S_HTC_WWE_2.36.405.8_R_Radio_1 2.54.60.25_26.09.04.11_M2_release_187331_signed.ex e
RUU_Ace_Gingerbread_S_HTC_WWE_2.50.405.2_Radio_12. 54.60.25_26.09.04.11_M2_release_199042_signed.exe
RUU_Ace_H3G_UK_1.37.771.3_Radio_12.28b.60.140e_26. 03.02.26_M_release_158897_signed.exe 
 Desire HD(Ace) HTC Firmware.....
RUU_Ace_HTC_ARA_1.83.415.4_Radio_12.28e.60.140f_26 .04.02.17_M2_SF_release_168914_signed.exe
RUU_Ace_HTC_Egypt_1.83.466.5_Radio_12.28e.60.140f_ 26.04.02.17_M2_SF_release_169396_signed.exe
RUU_Ace_HTC_TUR_1.43.468.2_Radio_12.28b.60.140e_26 .03.02.26_M_release_174571_signed.exe
RUU_Ace_HTC_WWE-AFK_1.38.421.1_Radio_12.28b.60.140e_26.03.02.26_M_ release_155956_signed.exe
RUU_Ace_HTC_WWE_1.32.405.6_Radio_12.28b.60.140e_26 .03.02.26_M_release_155891_signed.exe
RUU_Ace_HTC_WWE_1.72.405.3_R2_Radio_12.28e.60.140f _26.04.02.17_M2_SF_release_163262_signed.exe 
 Desire HD(Ace) HTC Firmware.....
RUU_Ace_HTC_ARA_1.83.415.4_Radio_12.28e.60.140f_26 .04.02.17_M2_SF_release_168914_signed.exe
RUU_Ace_HTC_Egypt_1.83.466.5_Radio_12.28e.60.140f_ 26.04.02.17_M2_SF_release_169396_signed.exe
RUU_Ace_HTC_TUR_1.43.468.2_Radio_12.28b.60.140e_26 .03.02.26_M_release_174571_signed.exe
RUU_Ace_HTC_WWE-AFK_1.38.421.1_Radio_12.28b.60.140e_26.03.02.26_M_ release_155956_signed.exe
RUU_Ace_HTC_WWE_1.32.405.6_Radio_12.28b.60.140e_26 .03.02.26_M_release_155891_signed.exe
RUU_Ace_HTC_WWE_1.72.405.3_R2_Radio_12.28e.60.140f _26.04.02.17_M2_SF_release_163262_signed.exe 
  Desire HD(Ace) HTC Firmware.....
Root

Superuser-3.0.7-efghi-signed.zip [calculate md5sum]
 Desire HD(Ace) HTC Firmware.....
custom

cm_ace_full-119.zip
cm_ace_full-151.zip
aospX-1.0.0-BR2-DHD.zip

Firmware for all HTC model


7 Trophy(Spark)

DFT_HSPL_WP7FG1_INSTALL.exe [calculate md5sum]

RUU_Spark_HTC_Europe_1.20.401.00_Spark_5.54.09_REL EASE.exe
RUU_Spark_S_HTC_Europe_4.06.401.00_5.69.09_RELEASE _2.exe
RUU_Spark_Vodafone_CH-DE_1.10.166.06_Spark_5.52.09_RELEASE.exe
RUU_Spark_Vodafone_DE_1.10.162.06_Spark_5.52.09_RE LEASE_2.exe
RUU_Spark_Vodafone_FR_1.10.163.06_Spark_5.52.09_RE LEASE.exe
RUU_Spark_Vodafone_GR_1.10.168.05_Spark_5.52.09_RE LEASE_2.exe
RUU_Spark_Vodafone_NL_1.10.172.06_Spark_5.52.09_RE LEASE.exe
RUU_Spark_Vodafone_SPA_1.10.164.06_Spark_5.52.09_R ELEASE_2.exe
RUU_Spark_Vodafone_UK_1.10.161.06_Spark_5.52.09_RE LEASE.exe
 HD2 HTC Firmware ............

RUU_Leo_HTC_ARA_1.66.415.9_Radio_15.37.50.07U_2.10 .50.08_2_Signed_LEO_Ship.exe
RUU_Leo_HTC_FRA_Bouygues_1.66.483.0_Radio_15.32.50 .07U_2.07.51.22_2_Signed_LEO_Ship.exe
RUU_Leo_S_HTC_DAN_3.14.403.2_Radio_15.42.50.11U_2. 15.50.14_LEO_S_Ship.exe
RUU_Leo_S_HTC_ELL_3.14.482.2_Radio_15.42.50.11U_2. 15.50.14_LEO_S_Ship.exe
RUU_Leo_S_HTC_GER_3.14.407.2_Radio_15.42.50.11U_2. 15.50.14_LEO_S_Ship.exe
RUU_Leo_S_HTC_ITA_3.14.408.2_Radio_15.42.50.11U_2. 15.50.14_LEO_S_Ship.exe
RUU_Leo_S_HTC_NLD_3.14.404.2_Radio_15.42.50.11U_2. 15.50.14_LEO_S_Ship.exe 
 HD2 HTC Firmware ............
RUU_Leo_S_HTC_NOR_3.14.409.2_Radio_15.42.50.11U_2. 15.50.14_LEO_S_Ship.exe
RUU_Leo_S_HTC_PTG_3.14.410.2_Radio_15.42.50.11U_2. 15.50.14_LEO_S_Ship.exe
RUU_Leo_S_HTC_RUS_3.14.411.2_Radio_15.42.50.11U_2. 15.50.14_LEO_S_Ship.exe
RUU_Leo_S_HTC_SPA_3.14.412.2_Radio_15.42.50.11U_2. 15.50.14_LEO_S_Ship.exe
RUU_Leo_S_HTC_SVE_3.14.413.2_Radio_15.42.50.11U_2. 15.50.14_LEO_S_Ship.exe
RUU_Leo_S_HTC_TUR_3.14.468.2_Radio_15.42.50.11U_2. 15.50.14_LEO_S_Ship.exe
RUU_Leo_S_HTC_WWE-AFK_3.14.421.2_Radio_15.42.50.11U_2.15.50.14_LEO_S _Ship.exe 
 HD2 HTC Firmware ............
RUU_Leo_S_HTC_WWE_3.14.405.2_Radio_15.42.50.11U_2. 15.50.14_LEO_S_Ship.exe
RUU_Leo_S_HTC_WWE_EastEurope_3.14.479.2_Radio_15.4 2.50.11U_2.15.50.14_LEO_S_Ship.exe
RUU_Leo_S_O2_DE_3.14.207.1_Radio_15.42.50.11U_2.15 .50.14_LEO_S_Ship.exe
RUU_Leo_S_O2_UK_3.14.206.1_Radio_15.42.50.11U_2.15 .50.14_LEO_S_Ship.exe
RUU_Leo_S_TMO_CZ_3.14.113.3_Radio_15.42.50.11U_2.1 5.50.14_LEO_S_Ship.exe
RUU_Leo_S_TMO_DE_3.14.111.1_Radio_15.42.50.11U_2.1 5.50.14_LEO_S_Ship.exe
RUU_Leo_S_TMO_HR_3.14.119.1_Radio_15.42.50.11U_2.1 5.50.14_LEO_S_Ship.exe 


[Recovery] [Unofficial] CWM RECOVERY 5.0.2.8 for KARBONN A9+

Good News for all KARBONN A9+ USERS.Finally I have compiled a FULLY WORKING CWM RECOVERY 5.0.2.8 for KARBONN A9+

I am the first one to do so Its easy to flash too

Make sure you have installed all drivers for your phone and USB DEBUGGING is enabled

Steps to flash the CWM Recovery

1. Download the zip from here
2. Extract the zip in a folder.
3. Run CWM Recovery.bat and follow the simple steps
4. Use the key combination to enter recovery

Known Bugs :

EVERYTHING WORKING
Screen Flickers because of changing res files to reduce the recovery size. You have to tolerate that

KEY COMBINATION
Volume up is Back
Volume down is scroll down
Power Key is SELECT

Thanks to : 1: I, me and Myself for taking the initiative and trying and making it possible
2: chrgegdoc and beer brand for being their for testing
3: Cyanogen-mod for the sources

DarkBoid ROM For Karbonn A21,A9+,Cherry Mobile


DarkBoid ROM


ROM For Karbonn A21 Which Is The Best ROM Till Now...Fastest Smoothest...Themed!! You Will Just Love This ROM Guys!!! Must Try This or You Gonna Miss it!!!


Quote:
Build From Scratch...
New Lockscreen
New Toggles
New Status Bar
Added A lot Of Tweaks
Support Init.d Tweaks
Improved Battery Life
Improved Touch Responsiveness
New UI
Added Trechubet
New Google Search
Added Apollo
New System Background
New Contacts And Phone Inteface
Added Build.prop Tweaks
Cleaned System
Added New Bootanimation and Shut down animation *Surprise*
New USB Debugging Sign
Option To Theme ICONS
Deodexed
Zip Aligned APK's
Improved Multi Tasking
New Image While Tapping The Android Version Rapidly
Added And Removed Apk's
Etc......You'll Find Out!!


1st: Go Here: CWM RECOVERY 5.0.2.8 for KARBONN A9+

Wipe Data/Factory Reset
Wipe Cache Partition
Wipe /system ( In Mounts And Storage )
Install Darkboid ROM
Reboot.....


Thanks To ashoknraj For Updater-Script And Eklovya For Recovery!!

Wait For 2 min When On Setup Let it Be Stable......... After Completing The Setup Reboot Once!!

Works with Karbonn A21, Karbonn A9+ , Cherry Mobile Flare....Test On Others Too..And Let Me Know.Its Working .... For All

NOTE:
Phone Should Be Charged Between 30-50% Minimum....
Follow The Steps Carefully And Accurately
I'm Not Responsible for Eating Your Phone and Bricking It...Do it at your own Risk...But It will Definitely Work!!!


DarkBoid ROM By Santo_Rock

RESET BLACKBERRY LCD Installers January 2013

Automated Installers are writing a special file on your computer (SFI AUTO LCD), so that the equipment fits the type of LCD installed in order to use any code serial or 002/004/005 etc.

How to use?

1 Run the file for the model (preferably place the new LCD before running)

2 Wait for the transaction and the computer displays ERROR 507 when the process is completed successfully

3 Then either reload software Quick Install Wizard or setup regular routes and / or OS update


ATTENTION BEFORE INSTALLING LCD RESET SHOULD TAKE PRECAUTIONS FOR

THIRD PARTY APPLICATIONS SUPPORT, BBM contacts, calendar, SMS ETC


RESET LCD 8520
LCD 8530 RESET
RESET LCD 8900
9000 LCD RESET
RESET 9000_2 LCD
9100-9105 LCD RESET
RESET LCD 9300
LCD 9320 RESET
RESET LCD 9330
LCD 9350 RESET
RESET LCD 9360
LCD 9380 RESET
RESET LCD 9500
9530 LCD RESET 2
RESET 3 LCD 9530
9530 4 LCD RESET
RESET 9530 LCD
9550 LCD RESET
RESET LCD 9670
9700 LCD RESET
RESET 9780
9790 LCD RESET
RESET LCD 9800
LCD 9810 RESET
RESET LCD 9860
LCD 9900 RESET
RESET LCD 9930
LCD 9981 RESET

How to Install NAND Android on HTC HD2 w ClockWorkMod Recovery

Prerequisites
HSPL3 ~ SPL-2.08.HSPL or HSPL4 (Better use HSPL3. HSPL4 still has issues or errors on some devices, so use it at your own risk).
Radio that support 576 RAM (ex. radio ROM 2.15)
DFT MAGLDR Bootloader
ClockworkMod Recovery


It's advisable to copy the NAND Android ROM zip file to the root of your SD card, before start, because some people face problems to do this after doing the first steps of the process. If you don't do it then you can do it later using a card reader or doing this:

In MAGLDR choose option: #4 USB Mass Stg
or
In CWM choose option: mounts and storage option


Make sure that you have all the prerequisites installed.
STEPS:
A1: Install HSPL3
or
A2: Install HSPL4
(HSPL4 still has issues or errors on some devices, so use it at your own risk).
B: Install radio ROM 2.15
C: Install MAGLDR on HTC HD2
D: Install ClockworkMod Recovery
(2 methods, choose the one you like)
E: Install NAND Android on HTC HD2 with ClockWorkMod Recovery


A1: Install HSPL3

Prerequisites

* Windows Mobile Device Center installed on Windows Vista / Windows 7 or
* ActiveSync installed on Windows XP
* You must have any SPL version from this list on your device:
o SPL 1.42.0000
o SPL 1.62.0000
o SPL 1.66.0000
o SPL 2.07.0000
o SPL 2.08.0000
o SPL 2.10.0000
(To check your SPL version, hold the Volume Down button and do a reset)
You should have this SPL version unless you are using the latest 3.14 ROM with SPL 3.03.0000. No worry, just downgrade your Windows Mobile ROM from v3.14 to v1.66 will do. Download HTC HD2 v1.66 ROM. Then downgrade your phone from SPL 3.03.0000 to SPL 1.42.000.

Step by Step Guide

1. Power off your phone.
2. Press volume down button (don’t let go) and power on your phone.
3. It will load into bootloader.
4. You should get ‘Red, Green, Blue and White’ screen with SPL-1.42.
5. Take off the battery.
6. Power on your phone.
7. Connect USB cable from PC to phone after Windows Mobile loaded.
8. Select ‘ActiveSync’ and click ‘Done’.
9. Open HSPL3_PKG.zip with 7-Zip.
10. Copy HSPL3_PKG.exe to desktop.
11. Execute HSPL3_PKG.
12. Follow onscreen instructions to install.
13. Click ‘Yes’ if User Access Control prompt up.
14. Bootloader will be loaded with USB status during starting of installation.
15. Select ’2.08.HSPL’ to install.
16. After installation, you should see ‘We hacked it!’ on your phone.
17. Click on ‘Yes’ and your phone should be rebooted and load into Windows Mobile.
18. Disconnect USB cable from phone.
19. To verify, power off your phone.
20. Press volume down button (don’t let go) and power on your phone.
21. It will load into bootloader.
22. You should get ‘Red, Green, Blue and White’ screen with SPL-2.08.HSPL.
23. That’s all.

OR

A2: Install HSPL4 (HSPL4 still has issues or errors on some devices, so use it at your own risk).

Prerequisites

* Windows Mobile Device Center installed on Windows Vista / Windows 7 or
* ActiveSync installed on Windows XP
* You must have any SPL version from this list on your device:
o SPL 1.42.0000
o SPL 1.62.0000
o SPL 1.66.0000
o SPL 2.07.0000
o SPL 2.08.0000
o SPL 2.10.0000
o SPL 3.03.0000 (for those using latest official HTC HD2 ROM v3.14)

(To check your SPL version, hold the Volume Down button and do a reset)

HSPL4 includes SPL-2.08.0000, SPL-2.08.HSPL, SPL-3.03.0000 and SPL-3.03.HSPL. The 3.03 SPL supports LEO1024.
You still need to use SPL-2.08.HSPL to use NAND Android and Windows Phone 7 and MAGLDR.
Make sure that you select the correct HSPL for your ROM installation.


Step by Step Guide

1. Power off your phone.
2. Press volume down button (don’t let go) and power on your phone.
3. It will load into bootloader.
4. You should get ‘Red, Green, Blue and White’ screen with SPL-1.42.
5. Take off the battery.
6. Power on your phone.
7. Connect USB cable from PC to phone after Windows Mobile loaded.
8. Select ‘ActiveSync’ and click ‘Done’.
9. Open HSPL4.zip with 7-Zip.
10. Copy HSPL4.exe to desktop.
11. Execute HSP4.
12. Follow onscreen instructions to install.
13. Click ‘Yes’ if User Access Control prompt up.
14. Bootloader will be loaded with USB status during starting of installation.
15. Select 2.08HSPL or 3.03HSPL. (This is to prevent people with 1024LEO's installing an incompatable version and bricking their device).
16. Click next
17. When its finished the phone should be rebooted and load into Windows Mobile.
18. Click ok to terminate program
19. Disconnect USB cable from phone.
20. To verify, power off your phone.
21. Press volume down button (don’t let go) and power on your phone.
22. It will load into bootloader.
23. You should get ‘Red, Green, Blue and White’ screen with SPL 2.08 or 3.03.
24. That’s all.


B: Install Custom Radio ROM

Prerequisites

* HSPL3 ~ SPL-2.08.HSPL

In order to flash custom radio ROM, you need to have HSPL3 installed on your HTC HD2. By the way, I used Radio Leo 2.15.50.14 on my guide. You can use it or any other HTC HD2 Radio ROM version.

HTC HD2 has 576 MB physical RAM but was reduced by software to 512 MB only. And custom Windows Mobile ROM + radio 2.07 or above can unlock it to be 576 MB again. Certain custom Windows Mobile ROM need higher radio version than your phone. And NAND Android requires it too. So you need to install custom radio ROM (if you don’t have the correct radio version).

Step by Step Guide

1. Power off your phone.
2. Press volume down button (don’t let go) and power on your phone.
3. It will load into bootloader.
4. You should get ‘Red, Green, Blue and White’ screen with SPL-2.08.HSPL.
5. Take off the battery.
6. Power on your phone.
7. I have R 2.06.51.07 at bottom of the screen with green HTC Logo.
8. Connect USB cable from PC to phone after Windows Mobile loaded.
9. Select ‘ActiveSync’ and click ‘Done’.
10. Open Radio Leo 2.15.50.14.rar with 7-Zip.
11. Copy CustomRUU.exe and RUU_signed.nbh to desktop.
12. Execute CustomRUU.
13. Click ‘Yes’ if User Access Control prompt up.
14. Follow onscreen instructions to install.
15. Bootloader will be loaded with USB status during starting of installation. (~10 minutes)
16. Phone will be rebooted after installation finished.
17. You should have R 2.15.50.14 at bottom of the screen with green HTC Logo.
18. Disconnect USB cable from phone.
19. That’s all.

C: Install MAGLDR

In order to install NAND Android on HTC HD2, you must install DFT MAGLDR Bootloader first. And the good news ~ both LEO512 and LEO1024 are supported. This means US T-Mobile HD2, Europe, Asia and the rest of the world’s HTC HD2 are supported.

Note – by installing MAGLDR, you cannot boot into Windows Mobile anymore. So everything on your phone is gone…

Prerequisites

* HSPL3 ~ SPL-2.08.HSPL
* Radio that support 576 RAM

No worry, Android on NAND is working. That’s the reason we install DFT MAGLDR Bootloader on our HTC HD2, right? And we will be able to load the latest Windows Phone version (if we are crazy...) when the ROM comes out. Okay, let’s get started. If you don’t have HSPL3, please install it first. And aslo install radio ROM 2.15.

Step by Step Guide

1. Power off your phone.
2. Press volume down button (don’t let go) and power on your phone.
3. It will load into bootloader.
4. You should get ‘Red, Green, Blue and White’ screen with SPL-2.08.HSPL.
5. Take off the battery.
6. Power on your phone.
7. You should have R 2.15.50.14 at bottom of the screen with green HTC Logo.
8. Connect USB cable from PC to phone after Windows Mobile loaded.
9. Select ‘ActiveSync’ and click ‘Done’.
10. Open DFT_LEO_MAGLDR113.rar with 7-Zip.
11. Copy MAGLDR113 folder to desktop.
12. Enter MAGLDR113 folder.
13. Execute ROMUpdateUtility.
14. Click ‘Yes’ if User Access Control prompt up.
15. Follow onscreen instructions to install.
16. Bootloader will be loaded with USB status during starting of installation.
17. Phone will be rebooted after installation finished.
18. DFT MAGLDR Bootloader will be loaded then.
19. Disconnect USB cable from phone.
20. That’s all.

D: How to Install ClockworkMod Recovery on HTC HD2

Prerequisites

HSPL3 ~ SPL-2.08.HSPL
Radio that support 576 RAM
DFT MAGLDR Bootloader

Please make sure that you have all the prerequisites installed.
If you don’t have HSPL3, please install it.
Also install radio ROM 2.1.
Finally, install DFT MAGLDR Bootloader.

There are two methods. They are both working. Choose the one you like.

Method 1

Step by Step Guide

1. Power on your phone and don’t let go power button.
2. DFT MAGLDR Bootloader will be loaded.
3. Use volume down button to go down to 4. USB MassStg.
4. Then press call button to enter USB Mass Storage mode.
5. Connect USB cable from PC to phone.
6. At PC, open Removable Disk (SD card storage).
7. Create a temp folder.
8. Open ClockworkMod-Recovery V.1.2 with 7-Zip.
9. Copy everything to temp folder.
10. Enter temp folder.
11. Enter copy_to_sd_root folder.
12. Copy initrd.gz and zImage files to SD card root level.
13. Then disconnect USB cable from phone.
14. Press power button to go back.
15. Use volume down button to go to 11. Reset.
16. Then press call button.
17. Press power button and don’t let go.
18. DFT MAGLDR Bootloader will be loaded.
19. Use volume down button to go down to 5. USB Flasher.
20. Then press call button to load Android Flasher mode.
21. Connect USB cable from PC to phone.
22. At PC, right click on DAF and select ‘Run as administrator’.
23. Click ‘Yes’ if User Access Control prompt up.
24. Follow onscreen instructions to install.
25. Phone will be rebooted after installation finished.
26. DFT MAGLDR Bootloader will be loaded then.
27. Disconnect USB cable from phone.
28. Press call button to load 2. Boot AD SD.
29. ClockworkMod Recovery will be loaded then.
30. That’s all.

Alternatively, there exist a faster method, from MAGLDR NAND Boot. It goes like this:

Method 2

Step by Step Guide

1. Download recovery with partition size for the type of rom you plan on using (150, 250 or 400) (to choose, see the guide at the bottom of this post).
2. Extract downloaded file
3. Go into MAGLDR and choose 5. USB Flasher.
3. On PC run DAF.exe and follow instructions
4. After installation completed and phone reboots, hold power key and select 8. AD Recovery
5. The phone will load into Recovery
6. That’s all.

E: Install NAND Android on HTC HD2 with ClockWorkMod Recovery

Install NAND Android on HTC HD2 with ClockworkMod Recovery is the 2nd method to have NAND Android on HTC HD2. And this can be done by using SD card only without PC. Just download the zip ROM to your SD card and you are ready to go. In addition, you can backup and restore ROM using Nandroid. Or you can try the 1st method through DFT MAGLDR Bootloader which requires PC with USB connection.

Prerequisites

HSPL3 ~ SPL-2.08.HSPL
Radio that support 576 RAM
DFT MAGLDR Bootloader
ClockworkMod Recovery


Having NAND Android on HTC HD2 is not a simple task like ABC. But it is not mission impossible too. Just follow these guides to get all the prerequisites installed. Please install HSPL3. Install Custom Radio ROM 2.15. Then, install DFT MAGLDR Bootloader. Finally, install ClockworkMod Recovery. Wow… Lot of steps but worth it. Trust me…

Step by Step Guide

1. Power on your phone and don’t let go power button.
2. DFT MAGLDR Bootloader will be loaded.
3. Use volume down button to go down to 4. USB MassStg.
4. Then press call button to enter USB Mass Storage mode.
5. Connect USB cable from PC to phone.
6. At PC, open Removable Disk (SD card storage).
7. Open your favorite ROM (ex. JawsMIUIrec1.0.7z) with 7-Zip.
8. Copy .data folder and ex. JawsNandRec1.1.zip to SD card root level.
9. There should be config and data files in .data folder.
10. Then disconnect USB cable from phone.
11. Press power button to go back.
12. Use volume up button to go up to 12. PowerDown.
13. Then press call button.
14. Power on phone and don’t let go power button.
15. DFT MAGLDR Bootloader will be loaded.
16. Press call button to load 2. Boot AD SD.
17. ClockworkMod Recovery will be loaded then.
18. Use volume down button to go down to ‘install zip from sdcard’.
19. Then press call button.
20. Use volume down button to go down to ‘choose zip from sdcard’.
21. Then press call button.
22. You should see ex. JawsNandRec1.1.zip.
23. Then press call button to select it.
24. Use volume down button to go down to ‘Yes – ex. JawsNandRec1.1.zip’.
25. Press call button and installation will be started.
26. When you see ‘Install from sdcard complete’, press power button.
27. Press call button to select ‘reboot system now’.
28. Phone will be rebooted and enter NAND Android automatically.
29. Follow onscreen instructions to setup Android settings.
30. That’s all.

Good Luck

Just below are the files where you can download directly, exept for the radio, that you can get it here: Radio Leo 2.15.50.14

(If you are going for the 2nd method of ClockWorkMode, then depending on what type of roms you plan on using, you should download the partition size based on the following:
  • 150MB Partition - For bare roms including CyanogenMod, AOSP, and MiUI
  • 250MB Partition - For Standard sense roms including Desire and EVo based ROMs, can also be used for some squashed HD builds
  • 400MB Partition - For Larger roms including unsquashed Desire HD and Z roms, ROMs REQUIRE data2sd for EU HD2 with 512MB NAND)


All file download form here


NOKIA 5130c-2690c-2700c Nokia Logo Trun Off Check Solution Step By Step

NOKIA 5130c-2690c-2700c Nokia Logo Trun Off Check Solution Step By Step

A1) flash lhe phone higher version via usb or Fbus
2) usb flashing time computer show usb error?
must check usb connector usb controll driver(remove usb esd)


usb flashing and fbus flash 100% done?but phone same nokia logo then trun off?

B1) open handset then check display connector or change display(display also make this problem)


2) remove camera and power on phone with battery,phone still same problem(nokialogo then trun off


3) check vcore,vio,vdram vrfc volt
this 4 volt controlled by combo ic
vdram,vrfc,vio volt controlled by AVILMA
Vcore controlled by BETTY
this 4 volt is prefect???then one thing is conformed avilma betty working fine


4) reflow or change keypad ic


5) Remove MMC ic


6) BT ic also make this problem(6120 75% nokia trun off bt ic)


7) finaly reflow or change combo ic


Respected viewers if you have any openion please post here its healpfull to all.

DU Meter 6.05 Build 3768 Incl Patches

DU Meter 6.05 Build 3768 Incl Patches

Download Link : DU Meter 6.05 Build 3768 Incl Patches.rar

DU Meter - displays the speed of your Internet connection, and separately show reception and transmission of data. Displays scalable schedule your connect in real time. Conducts detailed statistics. But it's not all: DU Meter can tell, or even disconnect from the Internet, if for some time been "pumped" the specified amount of data, play a sound file, for example, after each megabyte, etc.

Get a grip on your network traffic
Keep an eye on your Internet connection: see data coming in or going out
Have you ever found yourself wondering why some downloads seem to take an eternity to complete, or why your e-mail program seems to be stuck in the middle of e-mail retrieval. Is it really hanging, or maybe it's just downloading a large e-mail attachment? DU Meter provides the answer to these and other mysteries, and can also alert you of dangerous or unexpected network activity. Watching your data transfer rates can be very enlightening no matter what you do online, and you'll soon be wondering how you managed without DU Meter before.

DU Meter for parents and business managers
Receive alerts about dangerous or unexpected network activity

If you have teenage children or if you own or manage a small business, you already know how hard it is to enforce certain rules for network usage, while respecting child's or employee's privacy.
If you install DU Meter on your child's or employee's computer, you can configure it to report back to you via email when monthly or weekly network traffic exceeds a certain threshold. DU Meter will let you know if someone is breaking your rules (For example using peer-to-peer software to share films and music). Since DU Meter 5, the software can even prevent any further Internet connectivity once the alert condition has been met, without any user intervention.

Remember, you are legally responsible for what your kids are doing online. And while sharing music or videos may seem benign to them, copyright holding companies are suing peer-to-peer network users for thousands of dollars for copyright violations. DU Meter can alert you in time, so this kind of activity can be prevented.

Other DU Meter highlights
1. Provides clear graphical and/or numerical display
2. Reporting facility with export to many different file formats, including HTML, Excel, PDF and others
3. Permits close supervision of uploads and downloads
4. Compatible with all network interfaces: Dial-Up, Cable, ADSL, Ethernet, and others
5. Fully compatible with Windows Vista, Windows XP, Windows Server 2003 and Windows 2000
6. Requires minimal screen real estate and system resources
7. Involves no changes to your Windows system files
8. Auto-hide feature minimizes the meter to the system tray in the absence of network activity
9. Option to notify user or disconnect from the Internet automatically when network activity drops below a certain level
10. Useful stopwatch to accurately time downloads and report the average transfer rates

Download Link : DU Meter 6.05 Build 3768 Incl Patches.rar

WinISO v6.3.0.4765 Incl Working key

WinISO v6.3.0.4765 Incl Working key

Download Link : WinISO-v6.3.0.4765-Incl.key.rar

WinISO Standard 6.3.0.4765 (Update date: Jan. 17th, 2013)
1. Make ISO bug fixed.


WinISO is a professional CD/DVD/Blu-ray image file utility tool that can:

Make disc image files from CD/DVD/Blu-ray Drive
Convert image files between ISO / BIN and other formats. (Including NRG, CCD and MDS image file formats)
Extract, edit, rename ISO files directly
Burn ISO image file to CD/DVD/Blu-ray Disc
Make bootable CD/DVD/Blu-ray Disc images
Mount ISO image files
Bridge and unbridge file systems
With WinISO, you can easily add, delete, rename, and extract file(s) within original image files. It can also burn ISO image file to CD/DVD/Blu-ray Disc and mount ISO image files. Furthermore, it supports burning image files on-the-fly.

WinISO can process almost all CD/DVD/Blu-ray image files, including ISO and BIN/CUE. It has the ability to open an image file, display the file tree, and then run files within the image file. This is useful when viewing files, or running programs.

Download Link : WinISO-v6.3.0.4765-Incl.key.rar

AnyDVD (HD) v7.1.3.4 (Fully Registered)

AnyDVD (HD) v7.1.3.4 (Fully Registered)

Download Link : AnyDVD-HD-v7.1.3.4-Fully-Registered.rar

AnyDVD HD application will come with same functionality as AnyDVD, but with additional features for full HD-DVD (High Definition DVD) support, including decryption of HD-DVD movie discs. Allows you to watch movies over a digital display connection, without HDCP compliant graphics card and HDCP compliant display. No need to buy an expensive monitor. Sweet! AnyDVD HD is the “must have” utility for the serious home theater enthusiast using a media center / home theater PC.


7.1.3.4 2013 01 20

- New (DVD): Support for new discs
- New (Blu-ray): Support for new discs
- Change (Blu-ray & DVD): Time value for removing short video sequences can now
be adjusted in 0.5 minute steps
30 seconds seems short enough to keep all interesting extras like small deleted scenes,
but long enough to skip all annoying studio logos and still frames
0.5 minutes (30 secs) is now the default setting (was 1 minute)
- Change (Blu-ray): Made speedmenus more robust
- Some minor fixes and improvements
- Updated languages

Download Link : AnyDVD-HD-v7.1.3.4-Fully-Registered.rar

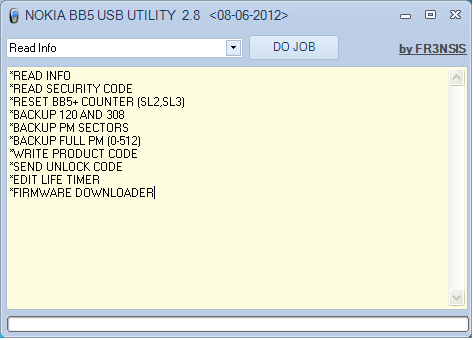
Nokia BB5 USB Utility v2.8 by Fr3nsis


Changes:

- added method for send unlock code into new phones

- added Nokia Firmware Downloader

Download:

Code:
http://www.mirrorcreator.com/files/SMOUGWEX/nokia_bb5_usb_utility_2.8_0.zip

All About Mobiles Headline Animator

Related Posts Plugin for WordPress, Blogger...
FeedReader button