All About Mobiles

http://www.infolinks.com/join-us?aid=2084565

How To Fix iTunes Error 40

How To Fix iTunes Error 40 - iTunes error 20 – 40 generally occur due to a problem with the hardware or software security issue. Sometimes, hosts file on some computers may be blocking Apple from contacting its server in other to verify a firmware.
How To Fix iTunes Error 40

You will notice that whenever a restore is to be made, Apple contact its server to verify if that IPSW is currently being signed or not. Also it checks the integrity of the IPSW to be restored. Therefore, whenever iTunes encounter troubles in carrying out these tasks, error 40 may occur.
To solve this problem, carefully follow these steps
Environment
  • Windows
Requirements
  • Download iTunes 11
  • iPhone USB cable in excellent condition
How To Fix iTunes Error 40

Step 1: Close all running applications on your computer
Step 2: Reboot your computer
Step 3: Stop antivirus running that may have activate firewall on your computer
Step 4: Open a folder and click on Organize at the top-left of the window
Step 5: Click Folder and Search options, click View and make sure Show hidden files folders and drives is checked.
Step 6: Click on the windows key on the keyboard and type Notepad
Step 7: Right Click on Notepad and select Run in Administrator.
Step 8: Click Open at the top – left window of the Notepad window. Navigate to this directory C:\Windows\System32\drivers\etc
Step 9: It may be empty, Just change the options from the box at the right side of the window from Text documents to All files
Step 10: elect hosts and it will display in the Notepad as shown in the image.
Step 11: Remove any link aside from what is in the image
Step 12: Click File, Save and exit Notepad
Step 13: Launch iTunes and then connect device with a good USB cable attached to the computer directly
Step 14: Hold Shift on the keyboard while you click Restore
Step 15: Now restore you device again using a stock IPSW and you won’t see the error anymore
Step 16: If problem persist, use another computer to perform the restore
iTunes error 40 is fixable. All you need do is follow the instructions carefully. Please feel free to comments on your success or where you have issues.

How To Install Vshare and AppCake Alternative Installous

How To Install Vshare and AppCake Alternative Installous – With the demise of install0us, which was the most reliable appstore to get cracked apps, numerous alternatives like AppCake, vShare, HIPStore etc got into the scene to replace and fit into the space that install0us left behind. Well, they are doing a pretty good job with AppCake being the best.
Personally, I have used AppCake once to download and test an app before buying the full version and am a little impress with it. Although, I use other sources to install apps into my iPhone especially if the file is 1gb and more . Anyways, if you want AppCake and vShare, follow the steps below.
Requirements
  1. A jailbroken iPhone, iPod or iPad running any version of iOS
  2. Internet connection
  3. AppSync
How To Install Vshare and AppCake Alternative Installous

Step 1: Launch Cydia and let it update all sources. When done, tap Manage –> then tap Sources.
Step 2: Tap Edit followed by tapping Add
Step 3: A menu box will appear, then you have to add
After adding the source you want tap “Add Sources” and tap “Add Anyway
Step 4: After its done, tap Return to Cydia and navigate to Manage –> Sources and click on iPhoneCake or Appvv for vshare
Step 5:Then people who want
  • Appvv should choose vshare or
  • AppCake should choose Appcake.
Note: iPad Users should choose AppCake HD,
Step 6: Tap Install and then Confirm. After installation, exit Cydia and you will see a new star icon, AppCake or vShare on your home screen. Click on it to access apps
Step 7: Click on any app and you can begin installing cracked apps. AppCake and vShare are reliable and its working well as of this writing.
__________________


Gsmjaker
..::Mobile media::..

Iphone charge no response solution tested 100%

-->

Iphone charge no response solution tested 100%


iPhone Check Warranty Unlock

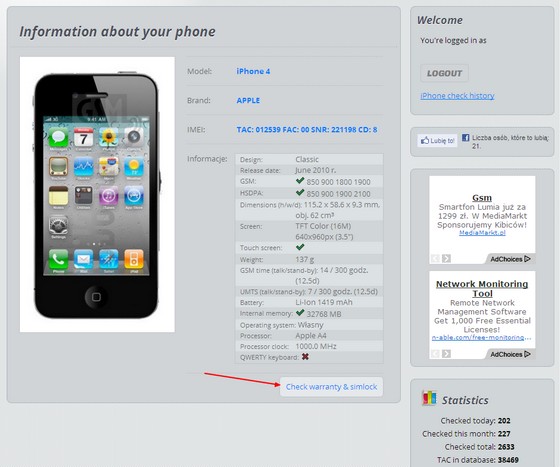
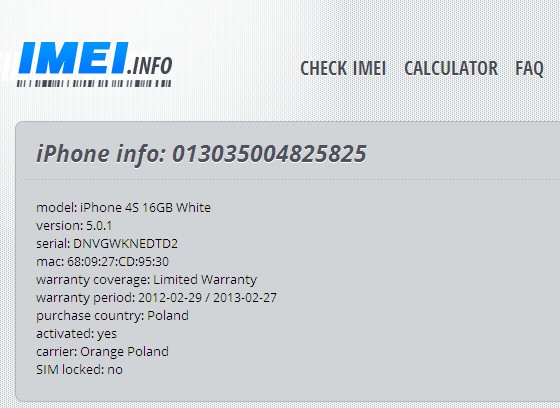
iPhone iPad Check Warranty unlock function allows to check which network is the iPhone and check simlock status. This information is needed to order unlock service. Checking is done on the basis of the IMEI number. Information comes directly from Apple base.


After entering and checking the IMEI number, click Check Warranty Unlock (below the phone's data). A moment later we get the following data:

  • The network on Which the phone is locked
  • Serial number
  • Color / capacity
  • The warranty period
  • The current version of the software

How to Downgrade Your iPhone 4 From iOS 6.x to iOS 5.x (Windows)

-->

How to Downgrade Your iPhone 4 From iOS 6.x to iOS 5.x (Windows)


Step One
Create a folder on your desktop called Pwnage

Download the latest version of RedSn0w from here and place it in the Pwnage folder. Likewise, download the firmware you would like to restore to and the firmware you are current on from here and place it/them in the Pwnage folder. 

Extract the RedSn0w zip file to the Pwnage folder.


Step Two
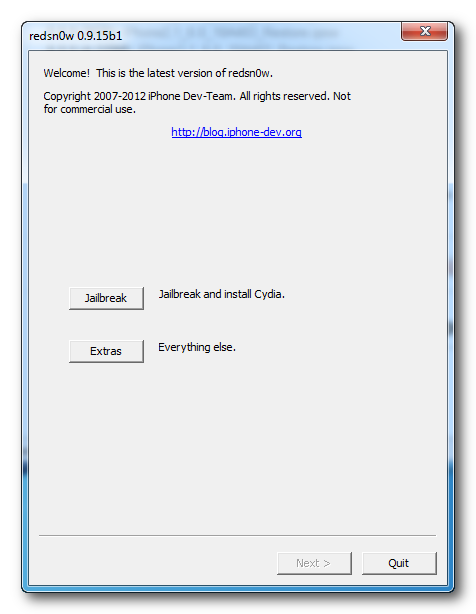
Right click or control-click the redsn0w application from the redsn0w folder we extracted earlier and choose Run as administrator from the popup menu that appears.


Step Three
Click Extras from the main menu.


Step Four
Click Even More from the Extras menu.

How to replace your iPhone 4 battery.

How to replace your iPhone 4 battery.


Step 1.

Open back side of iPhone 4.check the images for open back side.

1) Your iPhone 4 rear cover may have either two #000 Phillips screws or Apple's 5-Point "Pentalobe" screws . Check which screws you have, and ensure you also have the correct screw driver in order to remove them.
2)Remove the two 3.6 mm Pentalobe or Phillips #000 screws next to the dock connector.
Step 2.
Push the back side upward for remove the back cover.check this image for removing.
/Mobilessolutions.com.Apple_iPhone_4_32_battery+change+1.jpeg" style="border-bottom-style: none; border-bottom-width: 0px; border-color: initial; border-left-style: none; border-left-width: 0px; border-right-style: none; border-right-width: 0px; border-top-style: none; border-top-width: 0px; border-width: initial; list-style-image: initial; list-style-position: initial; list-style-type: none; margin-bottom: 0px; margin-left: 0px; margin-right: 0px; margin-top: 0px; max-width: 99%; outline-color: initial; outline-style: none; outline-width: initial; padding-bottom: 0px; padding-left: 0px; padding-right: 0px; padding-top: 0px; vertical-align: baseline;" width="400" />
 Step 3.
  Remove back side from your Iphone.

Step 4.

Remove the screw on the battery connector be careful some iPhone devices have 2 screw on the battery connector.


Step 5.
Use the Plastic stick for unlock jack lock.


Final Step 6.

Finally remove the battery strip from the jack follow these images.
Before reconnecting the battery connector, be sure the pressure contact (shown in red) is properly positioned next to the battery connector.
Before reassembly, be sure to clean all metal-to-metal contact points on the pressure contact as well as its contact point on the rear panel with a de-greaser such as windex (96% ethanol alcohol works well too, but make sure that contacts are dry when done). The oils on your fingers have the potential to cause wireless interference issues.

All About Mobiles Headline Animator

Related Posts Plugin for WordPress, Blogger...
FeedReader button