Recover Data from iPhone/iPhone 3GS/iPhone 4/iPhone 4S/iPhone 5
Get Back Your Lost Contacts, Photos, Messages and More!
No way to recover your lost files of iPhone, iPad or iPod Touch?That's simply not true. All you need is an iPhone data recovery tool. Keep reading the detailedsolution below.

All-in-on iphone&iTues data recovery: Recover iphone lost data computer directly,or recover from iTunes Backup File
Free download Iphone 4 Data Recovery
Free download Iphone 5 Data Recovery
Free download Iphone 4S Data Recovery
Free download Iphone 3GS Data Recovery

More tips:How to recover deleted files on iPhone 5 iphone 4S iphone 4 iOS 6? - manage-iphone.com
Welcome to visit us.
No way to recover your lost files of iPhone, iPad or iPod Touch?That's simply not true. All you need is an iPhone data recovery tool. Keep reading the detailedsolution below.
All-in-on iphone&iTues data recovery: Recover iphone lost data computer directly,or recover from iTunes Backup File
Free download Iphone 4 Data Recovery
Free download Iphone 5 Data Recovery
Free download Iphone 4S Data Recovery
Free download Iphone 3GS Data Recovery
More tips:How to recover deleted files on iPhone 5 iphone 4S iphone 4 iOS 6? - manage-iphone.com
Welcome to visit us.

Lava eris 351 Hard Reset Done
Lava eris351 Hard Reset Done
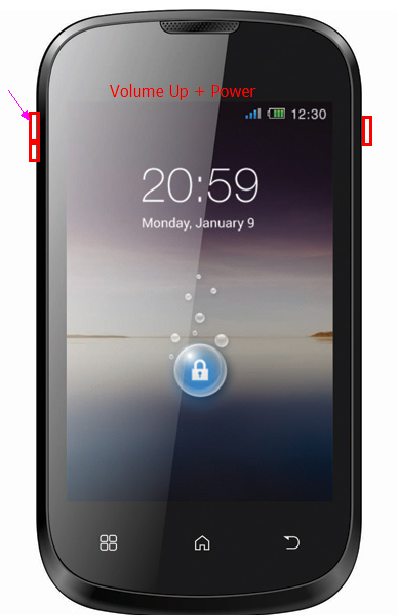
Press And Hold Volume Up + Power Key For 5 Sec
Use Volume Keys To Go Up and Down
Select wipe data/Factory reset
Press power key to select
Now Select Reboot System Now
Done
Press And Hold Volume Up + Power Key For 5 Sec
Use Volume Keys To Go Up and Down
Select wipe data/Factory reset
Press power key to select
Now Select Reboot System Now
Done
Lava N320 Hard Reset Solution
Lava N320 Hard Reset Solution
Google User name Pass Lock Remove Done
Press And Hold Volume Down + Power Key
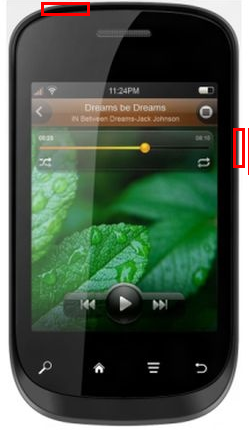
U Will See A Secret menu
Select 8Th Option (Clear Flash)
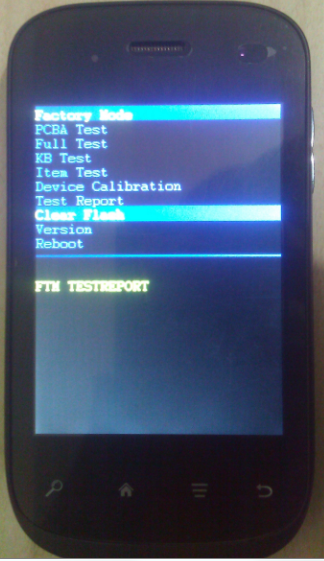
 DONE
DONE
Google User name Pass Lock Remove Done
Press And Hold Volume Down + Power Key
U Will See A Secret menu
Select 8Th Option (Clear Flash)
DONE 

Maxix H121 Flash File

Maxix H121 Flash File
Cpu:-{6250}
Size:- 4 mb
Info: HCN50D_11B_PCB01_gprs_MT6250_S00.Z35_MAXIS_2012102 4_V4_00
Symphony FT36 Read Write Sucsess By T-Box Easy Step By Step
Symphony FT36 Read Write Sucsess By T-Box Easy Step By Step


How To:Hard Reset G1 Google Phone
How To:Hard Reset G1 Google Phone
1. Turn the G1 off. If it’s frozen on, take the battery out and put it back in the unit.

2. Hold the Home and Power keys down at same time for about 25 seconds. You will see a yellow triangle screen with exclamation point in the
middle.
Now to wipe the device clean:
3. Press Alt+L.
4. Press Alt+W for a factory reset.
5. Press the Home and Back keys again for about 25 seconds.
The device should then reset again and the hard reset is complete.
Samsung 18150 Hard Reset Solved Too Many Pattern Attemps Problem Solution
Samsung 18150 Hard Reset Solved Too Many Pattern Attemps Problem Solution
Samsung Galaxy Wonder I8150 correct way for Hard Reset Problem: Too many pattern attempts.

Procedures:
* Press and Hold "volume Up" and "Home" buttons and press power on, wait until the screen display like this.

* Press "left soft" key to display "Android System Recovery Utilities"

* Select "wipe data/factory reset" by pressing "volume down" key

* Press "Home" button to select.
* Press "Volume Dow" key to select "Yes"
* Press "Home" button again and wait until finished
You are now completely reseted the phone back into his factory settings
* Press "Volume Dow" key to select "Yes"
* Press "Home" button again and wait until finished
You are now completely reseted the phone back into his factory settings
Samsung Glaxy i7500 Hard Reset
Samsung Glaxy i7500 Hard Reset

2 - Hold the SEND key (button to call) (2)
3 - Hold the POWER button (3)
4 - Hold the buttons until expression appears bootmode ...
5 - Wait until the warning appears (is a red triangle with a fulcrum of a Handheld).
6 - Hold the Menu button (4)
7 - Wait until the phone is restarted
How to Unlock Android Phone After Too Many Pattern Attempts Without Factory Reset
How to Unlock Android Phone After Too Many Pattern Attempts Without Factory Reset

1. Completely power off and power on your Galaxy-S phone.
2.
Right after you pass the Galaxy-S and just before the Verizon Wireless
logo video ends, immediately tap on the home button extremely fast and
repeatedly (at least 4-5 times per second). If the Emergency Call button
pops up, click that every now and then (3-5 times) but keep tapping on
the home button. During this process your phone may flash the password
screen or keypad screen just a few times and your phone will seem to be
lagging due to the tapping.
3.
Keep tapping until you see your Android home buttons stay steady at the
bottom. Voila, you’re in your phone! If the emergency keypad constantly
shows up or if it shows the Google account screen constantly, you have
failed. The success rate can be around 15-50% so keep trying until it
works. (You may want to grab a young phone-savvy guy or girl to do it if
your fingers are too slow)
4. Find and run the Settings App and go to Accounts & Sync.
5. Under Manage Accounts, remove all accounts except your Google account.
6. Press your power button off and on and enter your correct Google account information.
7. It will ask for a new security pattern. Enter it twice and you are done!
I
recommend the tapping method first but if that doesn’t work or you
don’t have a home button, here is a different method to try pretty much
based on the same concept. (again, will depend on app compatibility and
may not work for all phones)
This
method uses a free app called Screen Lock Bypass. (thanks to Michele
for introducing this, but no need to purchase the Pro version) Please
use this at your own risk as I cannot be responsible for any of the
results caused from using this app. Basically, you’ll be using this app
to bypass the screen lock and delete the other accounts blocking your
Google username/password to accept.
1.
Go to the Android Market download page on your desktop and install the
app. (Yes, you are able to install apps using your desktop instead of
your phone) Direct link: https://market.android.com/details?id=se.curity.android.screenlockbypass&hl=en (note:
You need to login to the Android Market using your Google username and
password that you used when you first set up your phone. This is the
username and password that “should have” unlocked your phone in the
first place.)
2.
Select the phone you have (this is why you need to login with the right
Google ID) and install the app. Wait about 5 minutes or restart your
phone and wait a good amount of time for the app to fully install.
3.
On the app instructions, it says to install any other app to trigger
the Screen Lock Bypass app. I did not do this but for me, restarting the
phone, waiting, soft off and on seemed to trigger it. (may have been
triggered by a message though, this is the part where it unexpectedly
blanked and disabled my screen for a good while.)
4. If it worked and bypassed the “too many pattern attempts” screen, go to phone Settings and then select Accounts & Sync.
5. Under Manage Accounts, remove all accounts except your Google account. (this should enable your Google username and password)
6. Go to Settings and select Applications, then Manage Applications.
7. Find Screen Lock Bypass and uninstall the app. (this will trigger the “too many pattern attempts” screen immediately)
8. Use your original Google username and password to finally unlock your phone properly.
9. Enter your new security pattern twice to finish!
If Method 2 worked for you, please leave your comments with your phone make and model to let us know!
Method 3
This was suggested by commenter Guru and has potential to work with all phones as it was claimed to work with the Galaxy S2.
Pre
Condition: You remember the pattern and you remember your Google
password and Android account is listed while using instructions below.
1.
Using your computer, log into your Google account. You can verify your
correct Google account using the Additional Tip at the bottom of this
article.
2. Go to this link directly – https://accounts.google.com/IssuedAuthSubTokens OR
click your e-mail on the top right corner, select Account settings,
then hit “Visit the previous version of the Google accounts screen”
towards the bottom, click “Authorizing applications & sites ” under
your Personal Settings > Security.
3.
Under “Connected Sites, Apps & Services – “Revoke Access” of your
Google Account with Android. You will see the screen showing “You have
successfully revoked access to Full Account Access”
[Alternate for step 3 - If you have already signed up for 2-Step Authorization previously and are able to generate a new application-specific password at the bottom, go ahead and generate a new password and use that password to unlock your device]
[Alternate for step 3 - If you have already signed up for 2-Step Authorization previously and are able to generate a new application-specific password at the bottom, go ahead and generate a new password and use that password to unlock your device]
4.
Enter Gmail login and password on your phone. It will now accept your
login details and will show a pattern screen. Enter the “correct”
pattern and you can see the home screen.
Again, if this works for you, let us know!
Good Luck!
[Additional Tip]
If you don’t remember your Google username and password, it may be an account that was used during signup and never used afterwards. You can confirm this by logging into your Google Account and going to this page: https://market.android.com/account. Select the Settings tab and you should be able to see your phone device. If you do not see your phone listed, it is probably under a different Google ID. If your phone carrier cannot retrieve your Google e-mail used during signup, try this link to possibly retrieve it:
https://accounts.google.com/RecoverAccount
[Note:
If these solutions didn't work for you, the last thing I can recommend
is a factory reset which is normally done through a simple button
combination that is different for each phone. You should be able to
google it or find factory reset instructions from your phone
manufacturer or cell phone service provider at no charge.]
Android Smartphone Management Tool 2.0.9
Android Smartphone Management Tool 2.0.9


Moborobo has been updated to V2.0.9. Users will be notified to update their Moborobo clients to Moborobo 2.0.9 or download a full Moborobo V2.0.9 client through
Moborobo v2.0.9 change log:
Language:
1. Added German to the supported language pack;
For iOS
1. Support iPhone5;
2. Support iOS6 firmware;
3. Released iOS management functions, supports iPhone/iPad/iPod;
4. Added Contact Management and SMS Management feature;
5. Added Call Log management feature(For Jailbroken devices);
6. Added Apps Management feature;
7. Added Icon Management feature;
8. Added Images Management feature;
9. Added Music Management feature;
10. Added Videos Management feature;
For Android
1. Added “App transfer” feature (Allowing users to transfer their Apps from the device to SD card);
2. Added “Default location” option to the app installation option;
3. Improved Image tab; change display layout, support sort by time, support keyboard controls, support sharing to SNS channels;
4. Improve the WiFi connection;
5. Improved other user interface to improve user experience;
Latest Version: V2.0.9.609
Software Size: 17.8MB
Last Updated: Dec.24
Operating System: Windows XP/Vista/7
DOWNLOAD
HOW TO FIX YOUTUBE VIDEO STOPS STREAMING WHEN SCREEN LOCKED On GOOGLE NEXUS 7:
HOW TO FIX YOUTUBE VIDEO STOPS STREAMING WHEN SCREEN LOCKED On GOOGLE NEXUS 7:
Once upgrading your Nexus 7 to Android 4.1.2, you may have some issues with the YouTube app, one of which is the video stops streaming when the screen is locked.
Usually, if you have a good network, then you wouldn't have a problem watching YouTube videos. But if the data network is slow, then you may pause the video waiting for it to buffer more data. However, while the video is pausing, your phone may go into idle mode and the screen is locked, at that point YouTube will just stop streaming. So to watch the video you will to download it again.

The answer is yes. All you need to do is extending the Lock screen time out, set the time period of 5-10 minutes. But if you don’t want to increase the time period for personal reason, then you will need to use third party app to help you deal with this.
Here's how to:
1. First, press the Home key to return to your Nexus 7’s Home screen.
2. Launch Google Play Store app.
3. Find and install the KeepScreen app.
- KeepScreen app will help you block the screen timeout with some selected apps that can be activated. This app is great if you would like to stream content while playing, too.
Just in case you want to extend the Lock screen Time out, go to Settings > Security. Then feel free to adjust the timeout period that you are comfortable with.
How to unlock Android phone after too many pattern attempts without factory reset
How to unlock Android phone after too many pattern attempts without factory reset
First login your gmail account.If not working try this solution.
Link is here
Android Phones Hard Reset
Android Phones Hard Reset
Performing a factory data reset deletes all data, including downloaded applications, and resets the device back to its initial state—the state before you turned on the device for the first time.Important Make sure to back up important data you have on the device before you perform a factory data reset."
HTC Dream
1. Turn the G1 off. If it’s frozen on, take the battery out and put it back in the unit.
2. Hold the Home and Power keys down at same time for about 25 seconds. You will see a yellow triangle screen with exclamation point in the
middle.
Now to wipe the device clean:
3. Press Alt+L.
4. Press Alt+W for a factory reset.
5. Press the Home and Back keys again for about 25 seconds.
The device should then reset again and the hard reset is complete.
++++++++++++++++++++++++++++++++++++++++++++++++++
HTC Magic
1. With the phone turned off, press and hold the HOME and BACK
2. Briefly press the END CALL/POWER button while continuing to pressHOME and BACK buttons.
3. When you see the screen with the 3 Android images, release the HOME and BACK buttons, and then press the TRACKBALL.
Tip : If your phone hangs or freezes, remove the battery then wait for a few seconds, and then re-install it. After re-installing the battery, turn on the phone.

++++++++++++++++++++++++++++++++++++++++++++++++++
HTC Hero
1. With the phone turned off, press and hold the HOME and BACKand then briefly press the END CALL/POWER button. The reset process will start after a few seconds.
2. Wait for the phone to finish the reset process and then press MENU.
Tip : If your phone hangs or freezes, remove the battery then wait for a few seconds, and then re-install it. After re-installing the battery, turn on the phone.
++++++++++++++++++++++++++++++++++++++++++++++++++
HTC Tattoo
1. With the phone turned off, press and hold the HOME and BACKand then briefly press the END CALL/POWER button.
2. Press the ENTER button to begin the reset process.
Tip If your phone hangs or freezes, remove the battery then wait for a few seconds, and then re-install it. After re-installing the battery, turn on the phone.
++++++++++++++++++++++++++++++++++++++++++++++++++
HTC Desire : reserved
++++++++++++++++++++++++++++++++++++++++++++++++++
HTC Whitestone : reserved
++++++++++++++++++++++++++++++++++++++++++++++++++
1. Turn the G1 off. If it’s frozen on, take the battery out and put it back in the unit.
2. Hold the Home and Power keys down at same time for about 25 seconds. You will see a yellow triangle screen with exclamation point in the
middle.
Now to wipe the device clean:
3. Press Alt+L.
4. Press Alt+W for a factory reset.
5. Press the Home and Back keys again for about 25 seconds.
The device should then reset again and the hard reset is complete.
++++++++++++++++++++++++++++++++++++++++++++++++++
1. With the phone turned off, press and hold the HOME and BACK
2. Briefly press the END CALL/POWER button while continuing to pressHOME and BACK buttons.
3. When you see the screen with the 3 Android images, release the HOME and BACK buttons, and then press the TRACKBALL.
Tip : If your phone hangs or freezes, remove the battery then wait for a few seconds, and then re-install it. After re-installing the battery, turn on the phone.
++++++++++++++++++++++++++++++++++++++++++++++++++
HTC Hero
1. With the phone turned off, press and hold the HOME and BACKand then briefly press the END CALL/POWER button. The reset process will start after a few seconds.
2. Wait for the phone to finish the reset process and then press MENU.
Tip : If your phone hangs or freezes, remove the battery then wait for a few seconds, and then re-install it. After re-installing the battery, turn on the phone.
++++++++++++++++++++++++++++++++++++++++++++++++++
HTC Tattoo
1. With the phone turned off, press and hold the HOME and BACKand then briefly press the END CALL/POWER button.
2. Press the ENTER button to begin the reset process.
Tip If your phone hangs or freezes, remove the battery then wait for a few seconds, and then re-install it. After re-installing the battery, turn on the phone.
++++++++++++++++++++++++++++++++++++++++++++++++++
HTC Desire : reserved
++++++++++++++++++++++++++++++++++++++++++++++++++
HTC Whitestone : reserved
++++++++++++++++++++++++++++++++++++++++++++++++++
iphone imei and carrier checker Links
iphone imei and carrier checker Links

iPhone IMEI Checker with SIMLock Status & Fast AT&T USA Iphone Unlock Service !
iPhoneIMEI.info :: Free iPhone IMEI Checker
IPhone 4S Front Camera Not Working Solution
IPhone 4S Front Camera Not Working Solution

Ipad mini ringer Not Working Solution
Ipad mini ringer Not Working Solution

ipad 2 Sim Not Detected Problem Solution
ipad 2 Sim Not Detected Problem Solution
IPad 2 Wifi + 3G sim card not detected.
After Change flex cable for sim connector but some times sim card
installed some time no. Turn on/off mode, power on/off , insert/extract
and sim card installed again. Change another original flex but the same.

Iphone5 Motherboard Layout with parts definition
Iphone5 Motherboard Layout with parts definition

iPhone 5 board front2 with definition

iPhone 5 board back1 with definition

A6 application processor

Audio codec 338S1077 Cirrus

By Mp3
How to Transfer Data from iPhone to New iPhone 5
How to Transfer Data from iPhone to New iPhone 5
Just
got yourself a new iPhone 5? Looking for the steps to move your data
from old iPhone to new iPhone 5? You’re at the right place. In this
guide, we’ll walk you through two simple methods to transfer your old
iPhone data to new iPhone.
Hit the jump for detailed step-by-step instructions to transfer data from old iPhone to the new iPhone 5
mportant
If
you have already booted your iPhone and started using it without
restoring from backup, all you need to do is to restore your new iPhone
back to factory settings. Factory reset will bring back the initial
setup screen where it offers you to restore from iCloud or iTunes. To factory reset your new iPhone:
Go to Settings > General > Reset and then tap “Erase All Content and Settings”
Your iPhone will reboot and will present you with initial setup screen. Now follow any of the two methods mentioned below…
Go to Settings > General > Reset and then tap “Erase All Content and Settings”
Your iPhone will reboot and will present you with initial setup screen. Now follow any of the two methods mentioned below…
Transfer data from old iPhone to new iPhone 5 using iCloud
iCloud
is the easiest way to transfer everything from your old iPhone to the
new iPhone 5 without any need for a MAC or PC, given that you have a
speedy internet connection and your old iPhone is running iOS 5 or
later. If you’ve not yet setup your iCloud account or have a slower
internet connection, we recommend you to scroll down and follow the
iTunes method mentioned below which is also quite easy.
- On you old iPhone, go to: Settings > iCloud, and login with your Apple ID;
- Now make your choices, turn ON whatever you want to backup to iCloud;
- Now scroll down and go to “Storage & Backup” and tap on “Back Up Now” button;
- Once the iCloud backup process, on your old iPhone, is completed, boot your iPhone 5;
- Follow the on screen iPhone setup instructions, and choose “Restore from iCloud Backup”;
- Wait until the iPhone 5 restores your old iPhone data from the iCloud backup which may take several minutes depending on your internet speed, and the size of the data backed up. When finished, your iPhone 5 will have all your personal data from the old iPhone.
Transfer data from old iPhone to New iPhone 5 with iTunes
In
case you don’t have iCloud setup, or your backup size is larger than
the iCloud storage, or due to slower internet connection you cannot
backup to iCloud, don’t worry, iTunes is there to cover you folks.
You’ll need a PC or Mac with iTunes installed. Although this method is
not as automated as iCloud backup is, but it’s still pretty simple and
may even be a faster iPhone backup option.
- Connect your old iPhone to your computer and launch iTunes;
- Right click on your iPhone in iTunes sidebar, under Devices, and click “Back up”;
- Wait for the backup to complete, then disconnect your old iPhone from your computer;
- Turn it on, follow the on screen setup instruction;
- select “Restore from iTunes Backup”, tap Next;
- Now connect your new iPhone to your computer;
- Select the most recent backup from the restore drop-down menu in iTunes, then click “Continue”;
- When the restore process is completed, the iPhone will reboot itself and your new iPhone will have all your data that you backed up from your old iPhone.
How to Check if Your iPhone is Factory Unlocked with IMEI
How to Check if Your iPhone is Factory Unlocked with IMEI
Did you just got your iPhone unlocked officially from AT&T or any other carrier? or paid someone to get your iPhone factory unlocked or bought a used iPhone and now want to check if it is factory unlocked or not? Don’t worry we got you covered. Hit the jump to learn how to check your iPhone unlock status in few easy steps.
To
check your iPhone factory unlock status, you need to know your iPhone’s
IMEI number. IMEI number, the International Mobile Equipment Identity,
is a unique identifier for all mobile phone, iPhone is no exception. An
IMEI number is a 15-digit long string which can tell you a lot about
your iPhone including iPhone unlock status.
There
are a few online IMEI checker services that ask for your IMEI number
and tell you if your iPhone is factory unlocked or not without putting a
SIM from a different carrier into it. These services make it easier to
check your iPhone’s SIM lock status, warranty and other information.
How to check iPhone Factory Unlock status
 Here are the step-by-step instructions to check if your iPhone is carrier unlocked or not:
- Find out your iPhone’s IMEI number. You can find it by going into Settings > General > About or simply dial *#06#.
- Now open any web browser and go to IMEI.info and there you’ll see an input box. Enter your IMEI in that box and click “Check” button.

Now click on the “Free SIMlock and Warranty Status Check” button.

Now
it should display if your iPhone is factory unlocked or not. If your
iPhone has been unlocked using unofficial methods such as Ultrasn0w or
Gevey SIM unlock, it should say Locked. Additionally, it tells you about the warranty status of your device.


Iphone 4 Battery Connector Full Path Ways Jumper
Iphone 4 Battery Connector Full Path Ways Jumper

Blackberry 9360 Trackpad Ways Jumper
Blackberry 9360 Trackpad Ways Jumper

Blackberry 9300 Mic Ways Jumper
Blackberry 9300 Mic Ways Jumper

Blackberry 9300 Mic Problem Solution
Blackberry Mic Jumper Trick Ways
Blackberry battery cross icon solution
Blackberry battery cross icon solution
first you chk the batery pin&battery
1 pont is +
2nd point is -
and other 2 point is bsi
you just chk boths point
with multimeter if bsi damaged its showing battery cross icon
one needls you pu t at ground other needls you put at bsi point
you chk the reading of bothes
is any one poin from boths sort with ground or dead its mean this poit is damge from power ic
then you need to make a jumper from ic to bsi point
other salution is try to short first both each other

Blackberry 9800 Charging Point Ways Jumper
Blackberry 9800 Charging Point Ways Jumper

Blackberry 9800 Charging Problem Solution
Subscribe to:
Posts (Atom)
All About Mobiles Headline Animator